Interpolation Flaps
Interpolation Flaps
Interpolation flaps transfer skin from remote reservoirs with a pedicle that bridges an isthmus of skin between the primary defect and the donor site. The flap pedicle remains intact until the blood vessels at the recipient site grow into and provide sufficient nourishment to the transferred skin. The ingrowth of new vessels is usually reliable after approximately 3 weeks, and the pedicle is divided during a second surgical procedure. Despite the disadvantage of more than one surgical stage, interpolation flaps are indispensable to repair large nasal defects that exceed the limits of local flaps or skin grafting.
Two interpolation flaps are common for nasal reconstruction. The melolabial interpolation flap (MIF) (cheek-to-nose interpolation flap) recruits skin from the melolabial fold and derives its blood supply from muscle perforators arising from the angular artery. This flap is most useful for defects of the ala, lateral nasal tip, and columella. The paramedian forehead flap recruits skin from the forehead and has an axial blood supply from the supratrochlear artery (STA). As a result of its larger tissue reservoir and more robust blood supply, the paramedian forehead flap is a more versatile flap capable of reconstructing wounds at all nasal locations. For a detailed discussion of interpolation flaps, see Chapter 26.
Melolabial interpolation flap The MIF, also known as the cheek-to-nose interpolation flap, is a random-pattern flap based upon the muscular perforating arteries branching from the facial, superior labial, and angular arteries in the nasolabial fold area (Fig. 39-23).24 The primary advantage of this two-staged flap is that it preserves the deep concavity of the alar-facial sulcus, the hairless apical triangle of the upper cutaneous lip, and the narrow isthmus between the melolabial fold and alar lobule. Authors have described multiple variants of the MIF, such as a banner-type flap,25 and an interpolated paranasal flap from the hairless nasofacial sulcus.26 The flap can be used to repair defects of the ala, nasal tip, and columella. This chapter will focus on the traditional design for alar defects (Fig. 39- 24).27,28
Planning begins with the assessment of the defect. The alar lobule does not contain cartilage, so broad or deep alar defects jeopardize the position of the alar margin. Defects involving more than 50% of the distal alar lobule will usually require free cartilage grafts to brace the ala against scar contraction and to support the airway (Fig. 39-24B). The conchal bowl or the antihelix serve as excellent cartilage donor sites. These cartilage grafts stabilize and preserve the convex shape of the ala, optimizing
both cosmesis and function. If the defect involves more than 50% of the alar surface, it may be expanded to include the entire alar subunit. The deep alar-facial sulcus at the lateral ala is especially difficult to repair, so 1 to 2 mm of the native ala should be preserved in this region whenever possible.
A template is made to match the exact size of the final defect. The melolabial fold is carefully traced with a surgical marking pen (Fig. 39-24A). The template is removed from the nose and rotated approximately 110 to 120 degrees toward the midline and transferred to the melolabial fold. In general, the donor site is located at the midpoint of the melolabial fold between imaginary horizontal lines drawn laterally from the alar sill and labial commissure. Even in men, this location usually does not contain significant terminal hair that would be transplanted to the ala. A rolled gauze may be used to simulate the rotation of the flap and confirm adequate length.
The superior margin of the template will lie directly against the melolabial fold and the anterior margin of the template will be the most inferior portion on the cheek. After ensuring proper orientation, the margins of the template are traced with a surgical marking pen. The fusiform design of the MIF can be completed by drawing the anticipated Burow’s triangles inferiorly along the melolabial fold and superiorly toward the nasofacial sulcus. To avoid standing cone deformities, the triangles should be drawn with sufficient length that the angles at the apices of the fusiform design are 30 degrees or less.
The templated portion of the flap is elevated at the junction of the subdermal fat and the nasolabial fat pad. Inclusion of the nasolabial fat pad within the templated portion of the flap will result in excessive thickness and bulky contour. Once the distal 80% to 90% of the templated portion of the flap has been dissected in this superficial plane, the dissection transitions to a plane in the deeper fat, with great care to preserve the perforators. The base of the proximal flap should be at least a finger width in breadth directly over the paranasal perforators just lateral to the ala. This most proximal dissection is performed with blunt scissor tips held parallel to long axis of the flap, spread about 3 to 4 mm apart and strummed or “pawed” with a gentle forward pressing motion. One can feel the plane separating freely. This dissection technique very effectively separates the fibrous septae necessary to loosen the flap while preserving the vessels. The same undermining technique is used to free up the flap at the superior margin and lateral margins, although there are more adherent fibrous connections along the alar crease junction and isthmus that often need some sharp dissection in the immediate subdermal plane above the muscle. Dissection continues until the flap freely rotates toward the defect without tension or torque. The donor site is closed in a layered fashion to simulate the melolabial fold. The inferior standing cone is excised and discarded.
The margins of the nasal defect are undermined immediately above the lower lateral cartilage or immediately superficial to the vestibular mucosa on the alar lobule. If
necessary, a free auricular cartilage graft is sutured to the vestibular lining, and may be tucked into the undermined areas. The flap is transferred to the nose and sutured under minimal tension with a layered closure, except at the alar rim, where only a simple layer of cutaneous sutures is necessary (Fig. 39-24C). Eversion should be avoided along the alar groove.
Three to four weeks later, the pedicle is divided. The base of the flap pedicle is excised as a fusiform ellipse along the superior nasolabial fold and may extend to the nasofacial sulcus. The donor site is repaired with standard layered closure.
The proximal aspect of the flap must be inset at the alar base and lateral alar groove. The proximal flap is elevated from the vestibular lining or free cartilage graft, and the proximal edges of the nasal defect are freshened, and all fibrotic and granulation tissues are excised. The subcutaneous fat and fibrotic tissue are thinned from the base of the flap to match the thickness of the ala. The flap is sutured into the alar crease with simple or layered closure, taking care to avoid eversion and simulate the normal concavity of the alar groove (Fig. 39-24D).
Paramedian forehead flap The paramedian forehead flap has an axial blood supply based on the STA, though forehead flaps do not need to contain the STA for survival (Fig. 39-25). Planning begins with careful assessment of the defect. Modifying the depth and breadth of the defect can improve contour or help to camouflage scars within cosmetic subunit junction lines. The surgeon must weigh the benefits of defect extension against the risks of airway compromise and added donor site morbidity. Increasing the defect size may make donor site closure more difficult. It also may increase the pedicle length and the likelihood that the donor site will involve hair-bearing scalp. If the defect has missing cartilage, free cartilage grafting may be necessary to restore nasal contour and projection and to stabilize the airway. Full-thickness nasal defects present the greatest challenge, as they require repair of mucosa, cartilage, and skin. Such defects are most common on the ala and soft triangle and may require a three-staged, rather than a two-staged, forehead flap.29,30
Once the final nasal defect has been created, the surgeon must make a template to size the flap. An oversized template will result in a bulky flap. An undersized template will increase tension at the primary wound, potentially distorting the free margins or compressing the distal cartilages. For precise sizing of the template, it is helpful to mold a flexible material, such as a nonstick gauze or aluminum foil of a suture package, to conform to the exact contours of the defect.
The template is then transferred to the forehead. Determining the side on which to base the flap depends primarily on defect location. For laterally based wounds of the ala, distal sidewall, or hemi-tip, the ipsilateral forehead is usually ideal. Ipsilateral
flaps require less length to reach the wound and are therefore less likely to extend into scalp hair. For laterally based wounds of the medial canthus and proximal nasal sidewall, contralateral flaps have less torque and still reach the defect without difficulty. Midline nasal wounds can use either side as the donor site.
After determining the preferred side, the surgeon maps the path of the STA, upon which the flap pedicle will be centered. The most prominent glabellar frown line corresponds to the junction of the medial corrugator and procerus muscles, and can be accentuated by pushing the medial brows inferomedially toward the midline.31 The STA is located anywhere from this glabellar frown line to 6 mm laterally.31 The path of the STA can be traced with a Doppler probe to identify rare anatomic variations that will not be detected by topographic mapping.
Once the STA is mapped, the surgeon transfers the template to the forehead. To ensure proper orientation, the template is placed on the nasal wound, then rotated 180 degrees toward the side on which the flap will be based. The template is placed in line with the STA so that the portion corresponding to the distal wound lies just inferior to the hairline. If more length is required and the surgeon wishes to avoid transferring scalp hair to the nose, the pedicle can be diverted to the contralateral forehead. Even without an axial blood supply, the distal flap will still have sufficient perfusion via the subdermal plexus.32
To ensure that the flap will reach the nasal defect, a gauze pad can be stretched from the most proximal part of the pedicle to the distal part of the template near the hairline, and rotation of the flap can be simulated with the gauze. After assuring adequate length, the surgeon can finalize the design. The template is situated at its precise forehead location, and its border outlined, with the proximal pedicle centered on the STA. A pedicle base width of 1.1 to 1.4 cm safely includes the STA and minimizes the increased torque seen with a broad pedicle. The flap’s templated portion is usually wider than its base. To optimize its blood supply, the narrow portion should widen progressively until it meets the templated portion.
The flap is elevated. For two-stage flaps, the thickness of the flap ideally matches the depth of the defect, since aggressive thinning during pedicle division and inset may compromise blood supply. If the incision extends through frontalis or galea before reaching the proximal 10% to 20% of the templated portion of the flap, the flap will usually have excessive volume.
Once the templated portion of the flap is elevated, the dissection proceeds through the frontalis and continues in the plane of the loose connective tissue. A scalpel or blunt-tipped scissors dissect the tissue away from muscle with minimal effort. As the dissection approaches the brow, the surgeon will see yellow fat deep to the corrugator muscle. Cotton-tipped applicators can be used to push away the corrugator muscle fibers without causing bleeding of the superior orbital plexus. Vessels deep to the
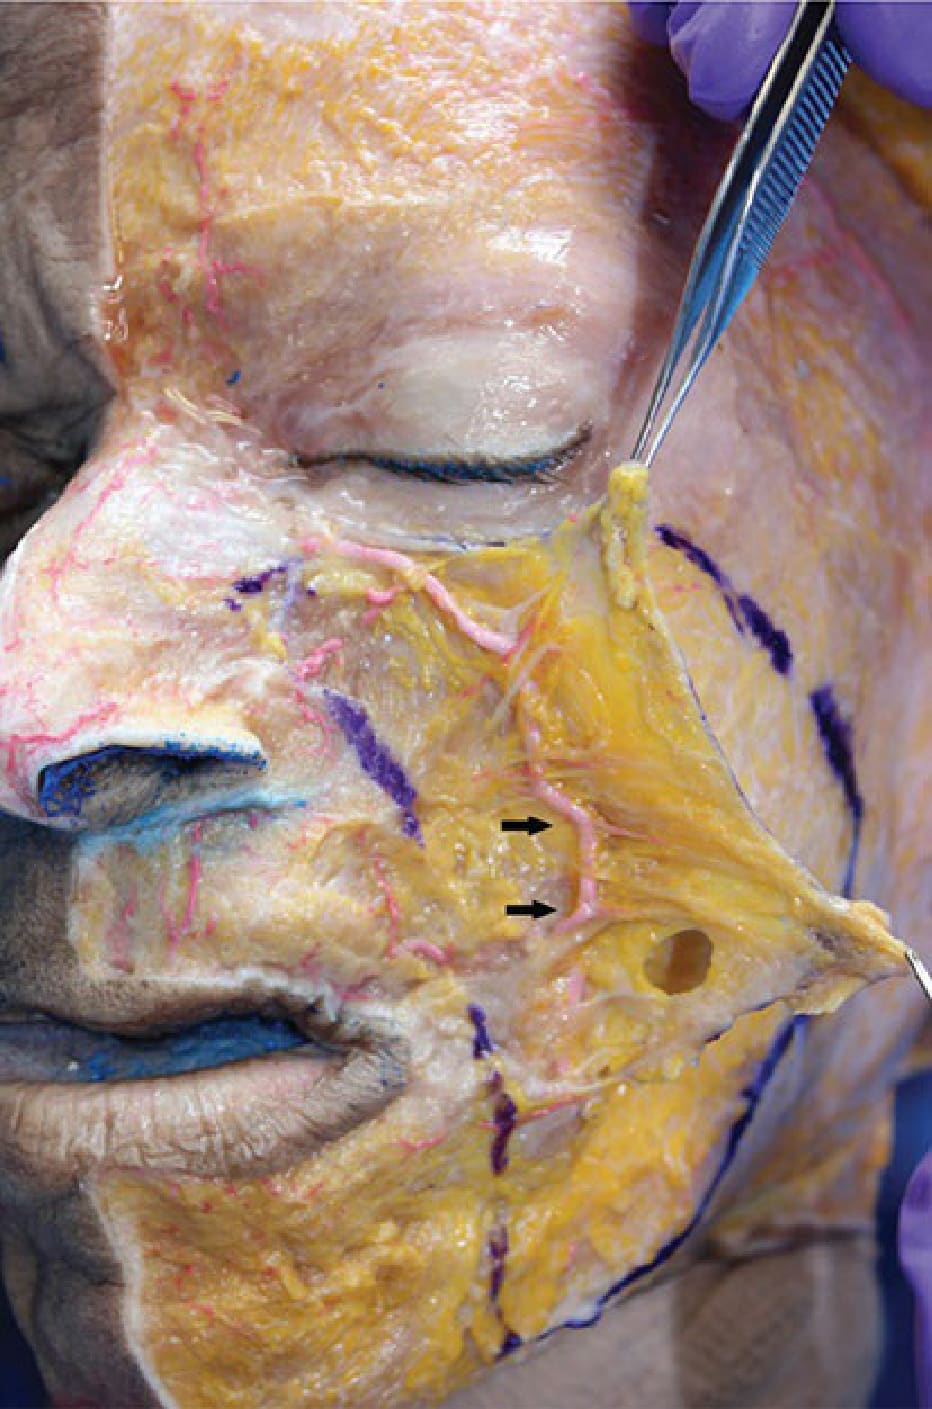
Figure 39-23. Trajectory of the facial artery and its perforators. An average of six perforating vessels from the facial artery pierce the overlying SMAS (retracted with forceps). The black arrows indicate the level of two of the perforating vessels.
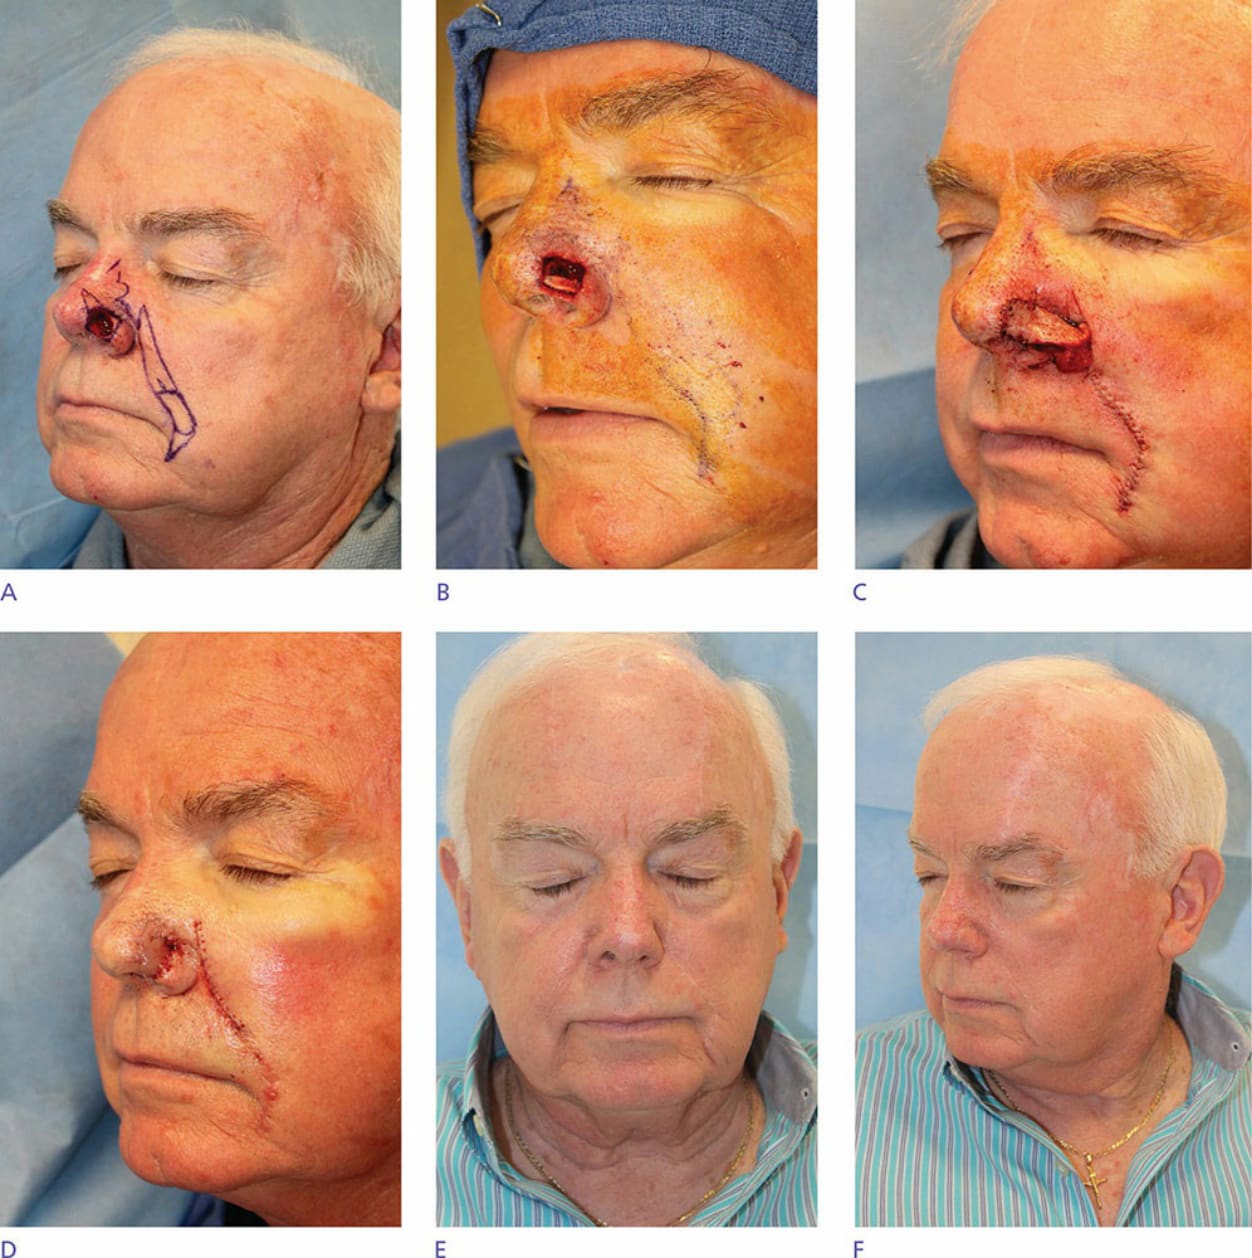
Figure 39-24. Nasolabial interpolation flap and free cartilage graft. (A) A nasolabial interpolation flap is designed for this anterior alar defect. A medially based trilobed flap was also considered. (B) Intraoperative photo showing a free auricular cartilage graft bracing the alar margin. (C) Appearance immediately after interpolation of the flap. (D) Appearance after takedown and inset of the flap pedicle 3 weeks later. (E,F) Follow-up photos show a relatively inconspicuous scar and preservation of the alar groove.
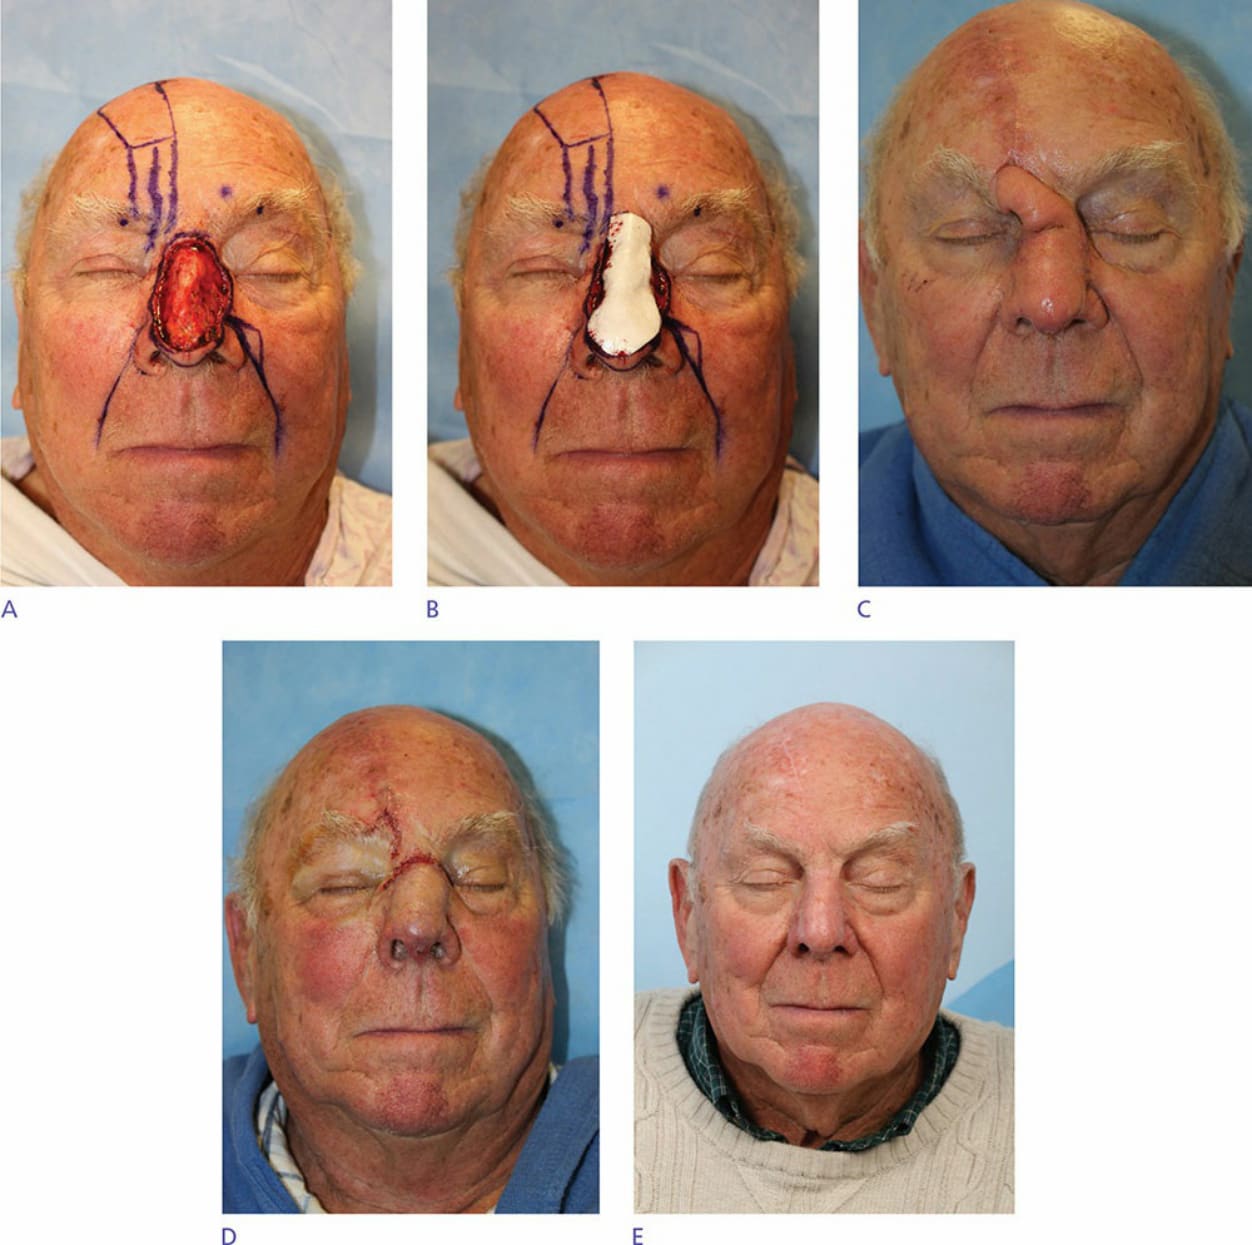
Figure 39-25. Two-staged paramedian forehead flap. (A) A paramedian forehead flap is designed for this large nasal defect. The pedicle is based around the Doppler-identified path of the supratrochlear artery. (B) The flap template is undersized on the proximal nose to avoid a bulky contour. (C) Appearance 3 weeks after the flap inset. The patient is ready for takedown and inset of the flap pedicle. (D) Appearance immediately after a second-stage takedown and inset. Note that the flap has the desired contour. (E) The nasal scar is inconspicuous at follow-up and contour is restored. The patient declined serial excision of the inverted scar on the tight forehead.